 |
Hair Special Effects: Creating a Dramatic Look with Unnatural Haircolor | ||
| Does your wildest imagination ever yearn to completely annihilate the mask of convention and leave it a smoldering pile of burning, blackened rubble? Well, of course it does! And what better way to turn convention on its head than by dyeing your hair a beautifully dramatic color? Helen Mirren has done it, rocking a stunning head of soft pink in place of her graying face-framing waves. Kelly Osbourne sports a fabulous head of dusty lilac locks, a luscious hue she and her colorist worked months to perfect. Unconventional haircolor, while still reserved for the more bold and stylishly outspoken among us, is no longer just for old blue-haired ladies and punks rocking electric orange mohawks; it has definitively found a legitimate place in the world of high fashion. |
 | |
| Now, there are several methods from which to choose to go about dyeing your hair an unnatural special effect color. There are hair-safe ways, and there are not-so-hair-safe ways. If you're a natural light blonde, the world is pretty much your oyster and no peroxide need ever touch a strand on your head. Unfortunately, if you have dark hair the only way to significantly change your color to a vibrant one is to do it the not-so-hair-safe way because you will have to lift your own color before you add the new. | ||
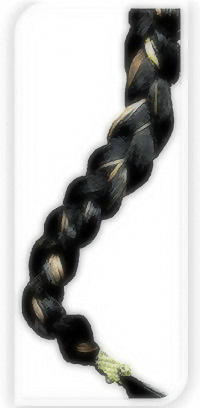 |
And no, nothing has changed at LongLocks, I will not personally recommend an unsafe method as anyone's best choice because we're still all about long gorgeous hair in fabulous condition and using peroxide to color your hair is not exactly how to achieve that. On the other hand, I'm not the dimmest bulb in the box and I know the determined won't listen to me (afterall, what do I know about hair?), so realizing this, I hope I can at least help you achieve your goal of brilliantly colored tresses while inflicting the least possible damage to your locks. Now, I do feel the need to point out that this is definitely a "do as I say, not as I do" thing. I have to be completely honest and admit that after decades of sporting a head full of virgin hair, the bottom couple inches of my mane at the nape of my neck (the only hair on my head I was willing to put at risk) is now platinum blonde all the way to the ends underneath my butt-length, naturally dark brown locks. I think it was actually a "mid-life crisis" thingy, but hey, I'm diggin' it. Or at least that's my excuse and I'm sticking with it. Besides, it makes for an awesome contrasting braid (see the photo to the right of the bottom 14" or so of my braid). Still ain't recommending you do it to your hair though. And if you choose to do any of this, in safe mode or not, make sure you read our disclaimer first. | |
All done reading? Good. Now, I strongly suggest you read this entire article before doing anything to your hair. You'll get a good idea of what you can and can't do with the different methods, and it will give you some time to consider which approach you want to take.
Using Kool-Aid to Add Sheer, Very Temporary ColorBefore using harsh chemicals on your hair, you can always try Kool-AidIf you don't have any issue with the statement, "I want my hair to smell like Jell-O," Kool-Aid is definitely the dye that's screamin' your name! Here's how to do it: 1. Add a liberal layer of petroleum jelly to the skin around your hair, especially your ears, and on any hair you don't want the dye to affect. 2. Put at least three packages of unsweetened Kool-Aid in a small bowl. Make absolutely sure you use the unsweetened variety or you'll end up with a sticky, horrible mess. You can choose whatever electric Kool-Aid colors you like: want to rock the blues? No worries. Kool-Aid can grant your wish. Just mix flavors: blue raspberry with a little grape. 3. Add a few drops of water and hair conditioner. Mix until no lumps remain and you have a paste that will distribute the color evenly. 4. Put on some rubber gloves | ||
5. If you're only doing a strand, wrap the hair in plastic wrap and tape it (the plastic wrap, not your hair... duh). If you're doing your whole head, you can either use the plastic wrap method or use a large plastic bag (this is not a toy, etc... you know the drill), edges facing front and back, and twist it at your forehead until it's tight. Tuck the end under the taught bag right above your forehead and slip a bobby pin 6. Go to bed. The plastic will seal in the moisture while you sleep. Of course you simply must dream about how Blake Shelton will think you're sooooo incredibly hot when he sees your new 'do that he'll immediately leave Miranda for you, and show up on your doorstep holding a brand new top-o'-the-line Mason Pearson 7. Remove the wrap come morning. Wash and rinse, rinse, rinse until the water runs completely clear. You don't want your white Moschino blouse to suddenly be sporting a blue collar now, do you? No, if Moschino wanted blue, the blouse would already be blue and you really can't improve on a Moschino design, now can you? No. Rinse again. 8. Deep condition your hair. Use a conditioner 9. Dry your hair as you normally do. I'm strictly a drip-dry girl myself, and if you are too, you might want to play it safe and put a towel around your shoulders just in case you didn't rinse quite as well as you thought you did. 10. It's mirror time! (I'll try to resist breaking out into my M.C. Hammer impression here but you do not know what you're missing). If you like the results then, YAY! You've triumphed! If you don't like the results, be thankful you used this method to try a whacky color the first time out; the color can be removed in a few washings without any harm to your hair whatsoever. If you really hate it, a hot oil treatment | ||
[Click above] | ||
Using Food Coloring to Add Temporary Hair ColorFood coloring is a little more permanent than Kool-Aid, but still much safer than chemical dyes. It will also work a bit better on slightly darker hair, within reason.Like Kool-Aid, food coloring Do keep in mind that food coloring stains skin and just about anything else it comes into contact with, including the grout between your bathroom tiles. Take appropriate defensive action against any future weekend remodeling you don't want to have to do. Or don't, if you're after a good excuse to convince a certain someone it's time for him to install a new floor, and by the way, you just happen to know exactly where you can get the most beautiful Italian granite tile. So, ya ready? Let's go! 1. Find an empty shampoo bottle or one of those handy plastic condiment bottles 2. Add a liberal layer of petroleum jelly to the skin around your hair, especially your ears, and on any hair you don't want the dye to affect. 3. Put on rubber gloves 4. Combine two tablespoons of food coloring with one tablespoon of shampoo. Fill up most of the bottle with water, but save a little room as you might want to add more food coloring to intensify the color, or more water to dilute it. In this part of the process, you are Monet mixing a color in your artist's palette. Shake the bottle to mix well. WARNING: Make ABSOLUTELY SURE, I repeat, make ABSOLUTELY SURE the bottle lid is screwed on tight, and if using the condiment bottle, your finger is also placed firmly over the spout opening. If you don't, you will be an unbelievably messy, repainting-requiring disaster about to happen. And I might add that even though I have spent many years mixing paint colors for my hair jewelry designs, there is absolutely no reason to assume that I would personally know anything about this sort of disaster because I would never be stupid enough to put bright blue iridescent acrylic paint and pearlized medium in a bottle and forget to tighten the lid before shaking it really hard and sending it flying all over my studio and all over me. And a dog. Boy, that would be a stupid thing to do, huh? Yeah, I just can't imagine. 5. Time to test your color, which is a must. This way if you don't like what you see you won't have to walk around with puke green hair for a month. What would you tell your boss? That is assuming I'm not your boss, in which case you'd just walk in every day and glare at me accusingly while pointing at your hair until I was guilted into giving you a huge raise and a month off with pay to recover from the trauma. Caution doesn't betray beauty in these situations. | ||
| If you aren't as fanatical about cleaning your hairbrush every time you use it as I am and there's enough strands caught in your bristles, pull them from your brush and use them to test your color. If you do clean your brush every time you use it, you can either test your color on a snipped strand, or if your hair is long enough and you are brave enough, an underneath strand that's still attached to the back of your head. If you choose the latter, just make sure you will be able to clearly see your strand as you test and it will be well-hidden if you don't like the color. Also, remember this method is okay to use only in situations that don't involve chemicals of any kind that require patch testing because they may cause an allergic reaction. | 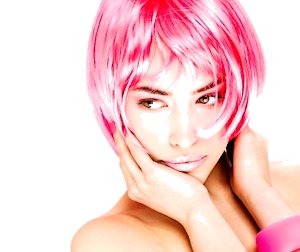 An unnatural color doesn't have to be punk, it can just as easily evoke a sense of trendy elegance. Photo courtesy of Marin of freedigitalphotos.net | |
| Dampen the test strand of hair completely, then thoroughly soak it with the food color dye. After 30 minutes for light hair and up to 90 minutes for dark hair, rinse the strand, let it dry and check the color. If you like it, you're good to go. If you want it lighter, darker, or more on the puce green (electric blue, toxic purple, etc.) side, adjust the food coloring ratios as necessary to achieve the the appropriate color; adding more food coloring or time to intensify the color; or add water to subdue the color. Test again until you have reached the right formula and timing for your own personal shade of fierce fuchsia or whatever hue you're after. 6. Once you have discovered the formula that gives you your desired results, wet your hair and thoroughly work the food color dye into it. If you're only doing a strand, wrap the hair in plastic wrap and tape it. If you're doing your whole head, you can either use the plastic wrap method or use a large plastic bag (this is not a toy, etc... you still know the drill), edges facing front and back, and twist it at your forehead until it's tight. Tuck the end under the taught bag and slip a bobby pin or clip over the edge to keep it secure. In this case, you can even use a shower cap 7. After the amount of time you have determined is appropriate for your desired hair color, remove the wrap and check to make sure the color is what you expect. If you are happy with it, hang your hair over the edge of your bathtub or sink, and rinse well with warm water until the water runs clear. Do not wash it now, nor the week following if you want to keep your color for as long as possible. | ||
| Continue to Page 2 ▶ |
© Copyright 2011-2019 Susan Maxwell Schmidt, All Rights Reserved.